So I sort of have a late start on my holiday projects....but better late than never, also I am pretty sure I will get done everything I have planned to make myself. I just started and finished this project today. This was fun because I have never done any quilting/batting before, it is always fun for me to learn new things. Actually this project was rather simple the hardest part is marking your quilt lines correctly. Once you have that done it is a breeze.
You will need:
about a 1/2 yard of fabric
batting, (since I enjoy using recycled materials I used layers of old towels for this project.)
bias tape (I made my own with some fabric scraps)
ruler
tailors chalk
thread
scissors
sewing machine
mitt pattern
Step one: For the mitt you will want to cut 4 , 10x13 in pieces from your fabric, and the same size for your batting/old towel cut 4 as well. On two of the pieces of fabric with your ruler and chalk mark 3 in diamonds. Take one of the pieces you marked and one of the un-marked pieces and place them wrong sides together. layer two of the pieces of batting together and pin and sew along your quilting lines. Repeat with the other pieces. For your pad cut 2 9x9 inch squares and 2 of the same size of the batting mark layer and quilt as well.
Step Two: Take your mitt pattern and pin to your quilted fabric and cut. Do this with both sides. Then with the right sides facing pin and sew the raw edges with 1/4 inch hem. Notch the curved edges and turn right side out.
Step Three: Finish the edges with your bias tape
Showing posts with label Kitchen. Show all posts
Friday, December 17, 2010
Tuesday, November 23, 2010
Cute things I made with some Unexpected extra fabric!
So I bought this really cute and cheerful fabric to make my kitchen curtains before I moved. Since I didn't wait to measure the windows I over estimated the yardage....Also for some weird reason I thought there was a sliding glass door in the kitchen to get out onto the porch, but in reality there is just a regular door, with a small window in it. So I way over estimated the fabric yardage! Oops, but I loved the fabric and was able to make some really cute stuff with it! Check it out!
Cute ruffle apron I designed and patterned myself. (Above) Simple circle skirt! (Below)
Oh and....I still have about 1 1/2 yards that I don't know what to do with.... Any Ideas?
Sunday, November 21, 2010
Magnetic Spice Rack
Okay so I got the idea for this a while back while browsing on Etsy.com. I thought that this was such an awesome way to display your spices without taking up cupboard/counter space. It is also very convenient when cooking and looks neat too. I thought that it would be cheap and easy to DIY myself this awesome spice rack. Well about $130 and few months later I finally have it finished. If you follow my instructions you could probably get this done for around 50$ or less and it will only take a day. I made a few costly mistakes along the way and also ended up buying a power drill(40$) for this project. If you do not already have one see if you can borrow one from a friend. If not no worries these also work great on the fridge. Personally I wanted mine above the stove for ease while cooking...which I do a lot of, so I used a sheet of metal that I picked up at Lowes for 7$ and drilled holes through it with my power drill so that I could screw it into the wall.
Supplies needed:
Glass jars that hold around 4oz. I bought my hexagon jars here Specialtybottle.com
You can also save baby food jars which would be free if you already buy baby food or maybe if you know someone who has a baby, you could ask them to save their jars for you.
Magnets, but not just any magnets (this was one of my mistakes) They have to be Neodymium at least 3/4" diameter and no thicker than 1/16" (they are basically the same size as a quarter) This is where I got mine emovendo.net these magnets are a little costly but if you don't use these kind your jars will not hold, they will slide or not stick at all. I ended up buying three different types of magnets before I bought these ones....which is why this project cost a lot more and took a lot longer.
Epoxy or super glue. I recommend Epoxy because it is stronger. However super glue will work.
As long as you have all the correct materials this project is a piece of cake. Glue a magnet to the lid of each jar. Allow them to dry for 24 hours. Add your spices and label the lids with a sharpie marker. Stick to your fridge or buy a sheet of metal like I did.
Friday, September 17, 2010
Owl Treasures!
I know it has been a while since I have made a post. I have not been doing much as far as crafts the past few weeks. I have tons of ideas but have not been to the craft store in a while. Which may not be a bad thing because I always spend way more than I plan too. With a big move not that far off I have decided that the less money I spend and the more I save the easier our move to Portland will be. However I did recently find a couple really awesome little treasures that I could not pass up. My owl obsession took over last week and I felt compelled to fill my kitchen with owls!
So this is my absolute favorite find of all time. My new Metlox PoppyTrail Owl cookie jar! A while back my friend Kaleena was passed down an owl cookie jar from her Grandmother. I believe it is also a PoppyTrail it is very similar looking. From that point on I wanted my own owl cookie jar. I think I have been looking at owl cookie jars on Etsy and Ebay for nearly a year now. I have come across many that I liked but for some reason the Metlox PoppyTrail always caught my eye. On Average they sell for around 60$ I was fortunate enough to win mine on Ebay for 23$ They do not always have them since they are vintage and are no longer made. You may have to wait around a while to find one for a good deal. I think my patients was well worth it! It is so beautiful in person, I just adore it! It has such a gorgeous Mustered and Rust colored glaze. It is in perfect condition as well!
I also found just the cutest Owl spoon (5$) rest and salt n pepper shakers (6$)on Etsy! I just love Etsy! You can find the coolest stuff there!
Not sure when my next post will be. So I apologize in advance if I don;t get around to making another one for awhile! I know I am going to be awful busy with getting everything organized for the move. Also going to be trying to save some money which will my no craft store trips. However I know I will have some good stuff to come....Usually when I move into a new place I have tons of ideas to personalize that space. Good things are coming! In the mean time Happy Fall!
Labels:
cookie jar,
Kitchen,
Owl,
Owls,
salt n pepper,
spoon rest
Friday, July 16, 2010
Cute Apron
Being a vegan I make a lot of home cooked meals. I also do all the housework. Personally I find that wearing an apron while I am doing these tasks helps to keep my outfit tidy. I't also comes in handy when you can't find a clean dish towel to dry your hands on. The apron I have been using for that past few years is just a plain black standard one. After looking on Etsy for ideas I figured I could make a pretty cute one myself. I bought some fabric I liked and just used by plain black apron as the pattern for my new one. It was pretty simple to make. The most difficult part was the little ruffle at the bottom and the pockets but even those were not to hard. I did not get enough pictures while I was making it to do a tutorial. I am so sorry, I have been having camera difficulties. I am really pleased with how it came out and still wanted to do a post on it. With every new sewing project, I get a little better. It seems like it was just yesterday that I got my sewing machine and made my first set of curtains, with crooked seems and all. I have come a long way and it just goes to show that practice pays off!
Monday, April 5, 2010
Design your own coffee mugs!

You will Need...
A set of coffee mugs. (ones with a smooth surface work best.)
Spray paint color/colors of your choice. (I used white and key lime)
Mod Podge Clear Acrylic Sealer
Acrylic paints of your choice. (I got a set of 30 colors for 10$)
Assorted Paint brushes
A cup of water for your paint brushes (to keep them clean and help fix mistakes)
Paper towels or any old towel you don't mind getting paint on.
Lots of time and patients! (I spent 2 days on this craft.)
Step One Make sure your cups are clean and dry. Depending on the cups that you have you may want to change the over all color of them. I used ones that I already had which had blue striping around them. So I used white and key lime spray paint to fix that. I wanted alternating colors so I used the white on the first two and the lime on the other two.

Spray painting Tips
*When you are spray painting you want to make sure you do it in a well ventilated area. Outside works best...If its not windy a garage would be a good place too.
*Also make sure you have some kind of tarp or plastic trash bag so you don't get paint everywhere.
*A good trick is to hold the can about a foot away from what you are painting. Move the can from side to side in a fluid motion this way the paint does not go on think in some spots and thin in others. Also this will cause less dripping.
*Don't be impatient! You will have to do more than one coat and wait for it to dry in between. If you want it to look nice try to do thin coats. This will take longer.
*Wear clothes and shoes you don't mind getting paint on...just in case!

Step Two 
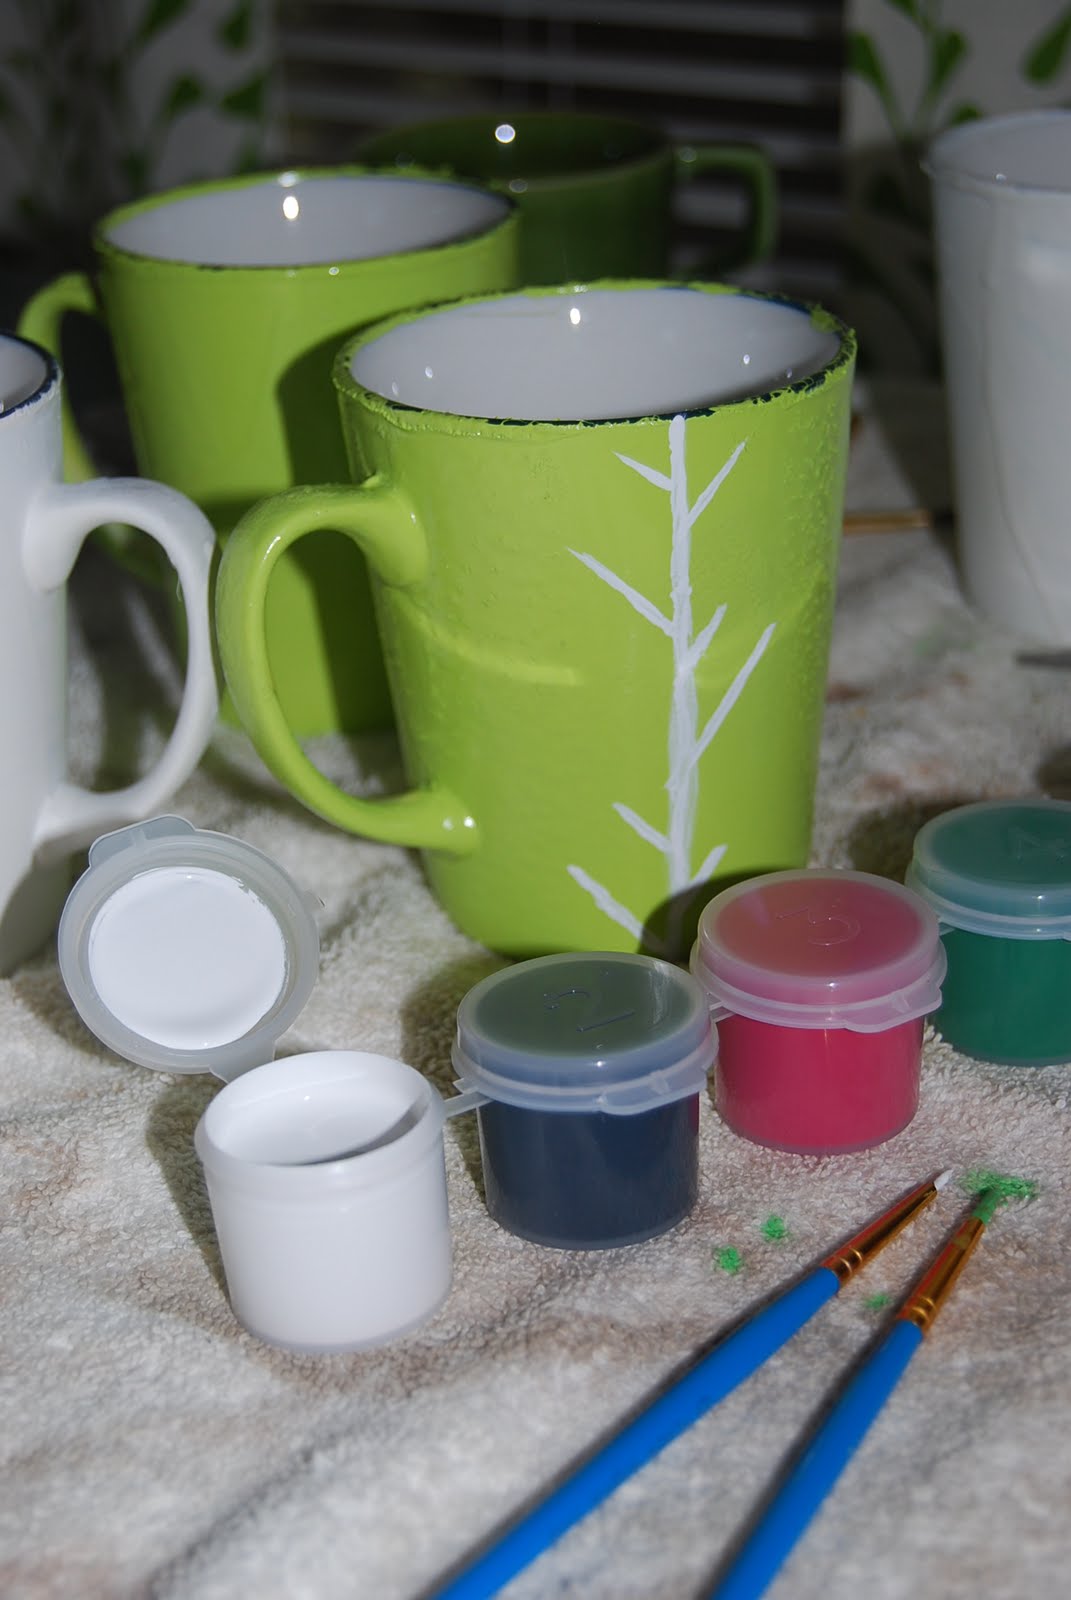
Once your cups have been painted and are completely dry lay down your towel/paper towels. get out a cup of water and your acrylic paints/paint brushes. If you plan on mixing colors together to get custom colors you may want to get out a paper plate. Begin to paint! If you don't have much painting experience like me just try something simple like polka dots or straight lines. If you make a mistake you can dip a clean brush in your water and go over it before it drys and the paint will come off easy just dry it with a paper towel and try again.


Step Three When you are finished painting all the cups and they are all dry take them back outside....or where you chose to spray paint them and you will need to seal them with you sealer spray....this way when you wash them the paint will not wash off. Follow the directions on the can. You may want to wear a mask....This stuff is really strong! Do a few coats and you are done. You now have an awesome set of coffee mugs!

Subscribe to:
Posts (Atom)