Showing posts with label Kitchen Sewing. Show all posts

Saturday, November 20, 2010

Update and Felt Owl Mobile

UPDATE

Hey Everyone, It has been a busy past month for me. The move went very well and we are getting comfortable in our new home. We just LOVE Portland. I personally am thrilled to be out of Bangor finally. Everyone is so much nicer and polite here, not to mention so much more diversified and cultured. I finally feel at home and I just love our new place. It is slightly smaller than the apartment we left in Bangor but surprisingly I hardly notice. It is plenty of room for us. I have been busy unpacking, organizing. and decorating the past few weeks so I have just recently been able to start some projects. Here is one of the first ones so far.....don't worry there will be more to come!


FELT OWL MOBILE

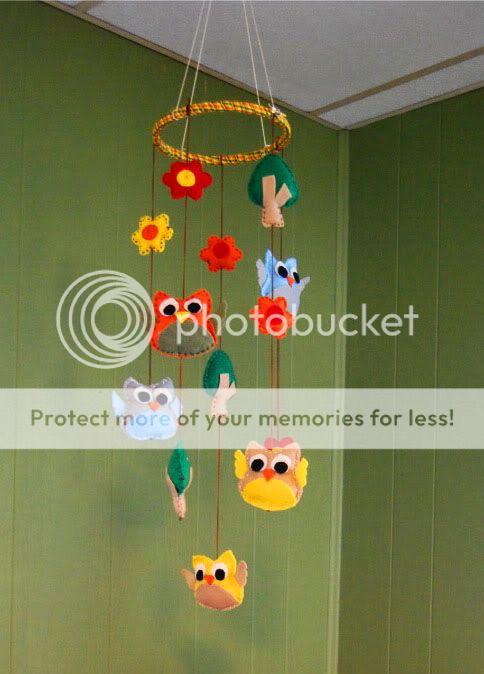
So if you don't already know the twin's nursery is owl themed. Right now owls are all the rage so it is very easy to find cute owl stuff for nursery's...but if you don't want to spend a lot of money and still want something cute you should try this out! This is a very CHEAP and EASY project that I am certain anyone could do.

Supplies needed include: Pencil and paper (for making patterns),Various colored felt, embroidery floss, small amount of poly-fil, Scissors, Hot glue gun/glue sticks, straight pins, wooden or plastic ring, ribbon(optional).

You will have to make your own pattern but owls are pretty simple, a  good trick to use is to fold the paper in half and draw only half the owl body using the crease as the middle. This ensures that it will be symmetrical. It is also a good idea to try to find images on the web to give you a better idea of what it should look like. You don't even have to do owls. Really you could do anything bears, lions, cars, rocket ships. Whatever. Once you have your patterns all cut out you can pin them right to the felt and cut out your pieces. Then you just hand stitch along the edges with your embroidery floss, stop before you make it all the way around to put some poly-fil in and then sew the rest up. Use hot glue to glue on any outside pieces like the eyes. You can wrap the wooden ring in pretty ribbon if you want. then just string all the finished pieces with the embroidery floss and tie to the ring, Use some more embroidery floss to hang.

Wednesday, August 11, 2010

Hand towels


This is an easy project, so easy that it hardly needs a tutorial. I wanted to make some matching kitchen towels to go with my place mats and napkins. I got some waffle textured cotton fabric on the cheap for 5$ a yard I was able to make 4 towels from one yard as well as the scarps I had left over from my place mats and napkins. I think they came out pretty cute and they didn't take long to make.


You will need:
1 yard of absorbent fabric.
small amount of decorative fabric.
coordinating thread
sewing machine and scissors


Step one: Cut your yard of  fabric in quarters. Then cut 4 strips of the decorative fabric the same width of your quartered fabric. Sew 1/4 inch hem on each raw edge of the strips. Once all your strips are hemmed you can pin them to your towel where you like. (If you use the waffle textured cotton fabric that I used it is very easy to line up the strips perfect and later to sew perfect hems on the towel.) Sew the strips to the towel.


Step Two: Sew another 1/4 inch hem all the way around the towel. You are done! It is that simple!