This is the first time I have ever made a wreath and I had a lot of fun making it! I think it came out really cute. Also this idea is very versatile you could use different colors and you have a wreath for spring, summer, or fall.
You will need:
A 10" foam wreath form
yarn rolled into a ball
felt
any other wreath decorations you would like to add (optional)
some scrap material (optional)
hot glue gun and glue
scissors
Step One: Take some scrap fabric and wrap it around your wreath, glue down to secure. This is not entirely necessary but the only wreath form I could find was rough and the yarn kept sticking to it which made it difficult to work with. Starting anywhere glue down the end piece of your yarn. Holding the wreath with your knees use both hands to pass the yarn ball around the wreath to wrap it. (I found this was the easiest/quickest way.) Don't wrap too loose or too tight. Continue until completely covered. Check for gaps where fabric is showing and go back and cover them. Cut the yarn and glue down the end to secure.
Step Two: Decorate, add any wreath accessories you got. With the felt use something round like a small plate to make a circle and cut it out. Then draw or free hand cut the circle in to a spiral. Roll up and hot glue the end in place. Use different size circles for different sized flowers. You can hot glue them right to the yarn. Loop a piece of string around the top of the wreath to hang or use a wreath hook.
Sunday, November 28, 2010
Wednesday, November 24, 2010
Pumpkin Spice Cream Cheese
Here is a special treat for Thanksgiving! I whipped this together today and it was so yummy I felt like sharing it.
Ingredients:
8 oz. cream cheese, softened
3 tablespoons brown sugar
2 tablespoons pure maple syrup
1/4 cup canned unsweetened pumpkin
1/2 teaspoon pumpkin pie spice
1/4 teaspoon cinnamon
1/4 teaspoon vanilla extract
Directions:
1. In a small bowl, beat softened cream cheese, sugar, and syrup til creamy.
2. Add pumpkin, spices and vanilla and beat til smooth.
3. Refrigerate for at least an hour.
4.Try on a toasted bagel, apple slices, or mix in with some oatmeal!
Ingredients:
8 oz. cream cheese, softened
3 tablespoons brown sugar
2 tablespoons pure maple syrup
1/4 cup canned unsweetened pumpkin
1/2 teaspoon pumpkin pie spice
1/4 teaspoon cinnamon
1/4 teaspoon vanilla extract
Directions:
1. In a small bowl, beat softened cream cheese, sugar, and syrup til creamy.
2. Add pumpkin, spices and vanilla and beat til smooth.
3. Refrigerate for at least an hour.
4.Try on a toasted bagel, apple slices, or mix in with some oatmeal!
Tuesday, November 23, 2010
Cute things I made with some Unexpected extra fabric!
So I bought this really cute and cheerful fabric to make my kitchen curtains before I moved. Since I didn't wait to measure the windows I over estimated the yardage....Also for some weird reason I thought there was a sliding glass door in the kitchen to get out onto the porch, but in reality there is just a regular door, with a small window in it. So I way over estimated the fabric yardage! Oops, but I loved the fabric and was able to make some really cute stuff with it! Check it out!
Cute ruffle apron I designed and patterned myself. (Above) Simple circle skirt! (Below)
Oh and....I still have about 1 1/2 yards that I don't know what to do with.... Any Ideas?
Monday, November 22, 2010
Paper Crafts!
Sunday, November 21, 2010
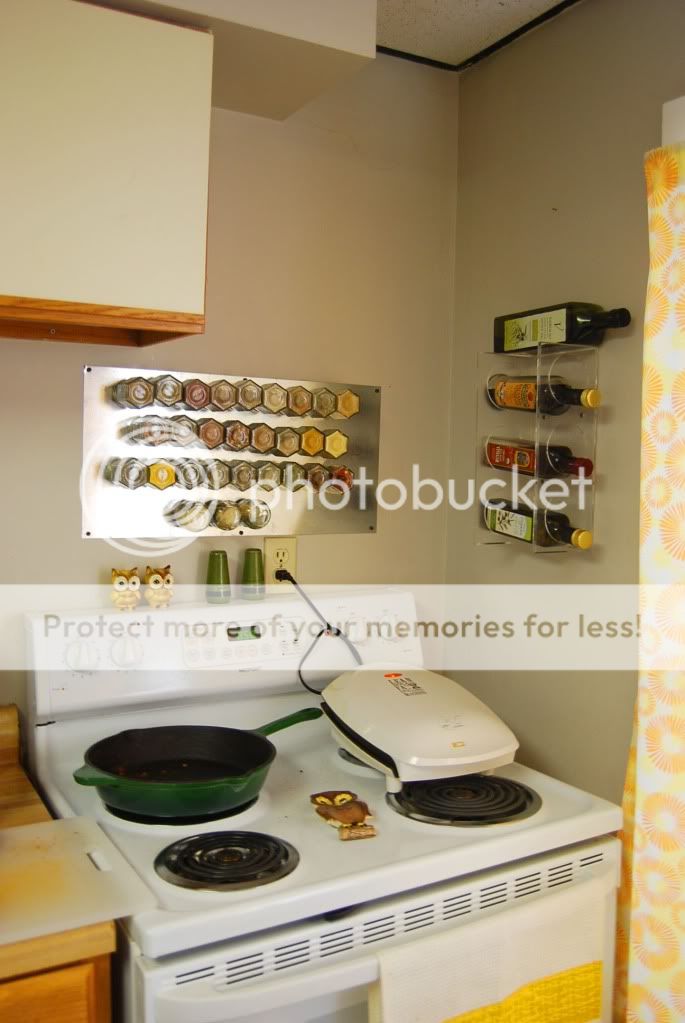
Magnetic Spice Rack
Okay so I got the idea for this a while back while browsing on Etsy.com. I thought that this was such an awesome way to display your spices without taking up cupboard/counter space. It is also very convenient when cooking and looks neat too. I thought that it would be cheap and easy to DIY myself this awesome spice rack. Well about $130 and few months later I finally have it finished. If you follow my instructions you could probably get this done for around 50$ or less and it will only take a day. I made a few costly mistakes along the way and also ended up buying a power drill(40$) for this project. If you do not already have one see if you can borrow one from a friend. If not no worries these also work great on the fridge. Personally I wanted mine above the stove for ease while cooking...which I do a lot of, so I used a sheet of metal that I picked up at Lowes for 7$ and drilled holes through it with my power drill so that I could screw it into the wall.
Supplies needed:
Glass jars that hold around 4oz. I bought my hexagon jars here Specialtybottle.com
You can also save baby food jars which would be free if you already buy baby food or maybe if you know someone who has a baby, you could ask them to save their jars for you.
Magnets, but not just any magnets (this was one of my mistakes) They have to be Neodymium at least 3/4" diameter and no thicker than 1/16" (they are basically the same size as a quarter) This is where I got mine emovendo.net these magnets are a little costly but if you don't use these kind your jars will not hold, they will slide or not stick at all. I ended up buying three different types of magnets before I bought these ones....which is why this project cost a lot more and took a lot longer.
Epoxy or super glue. I recommend Epoxy because it is stronger. However super glue will work.
As long as you have all the correct materials this project is a piece of cake. Glue a magnet to the lid of each jar. Allow them to dry for 24 hours. Add your spices and label the lids with a sharpie marker. Stick to your fridge or buy a sheet of metal like I did.
Supplies needed:
Glass jars that hold around 4oz. I bought my hexagon jars here Specialtybottle.com
You can also save baby food jars which would be free if you already buy baby food or maybe if you know someone who has a baby, you could ask them to save their jars for you.
Magnets, but not just any magnets (this was one of my mistakes) They have to be Neodymium at least 3/4" diameter and no thicker than 1/16" (they are basically the same size as a quarter) This is where I got mine emovendo.net these magnets are a little costly but if you don't use these kind your jars will not hold, they will slide or not stick at all. I ended up buying three different types of magnets before I bought these ones....which is why this project cost a lot more and took a lot longer.
Epoxy or super glue. I recommend Epoxy because it is stronger. However super glue will work.
As long as you have all the correct materials this project is a piece of cake. Glue a magnet to the lid of each jar. Allow them to dry for 24 hours. Add your spices and label the lids with a sharpie marker. Stick to your fridge or buy a sheet of metal like I did.
Saturday, November 20, 2010
Update and Felt Owl Mobile
UPDATE
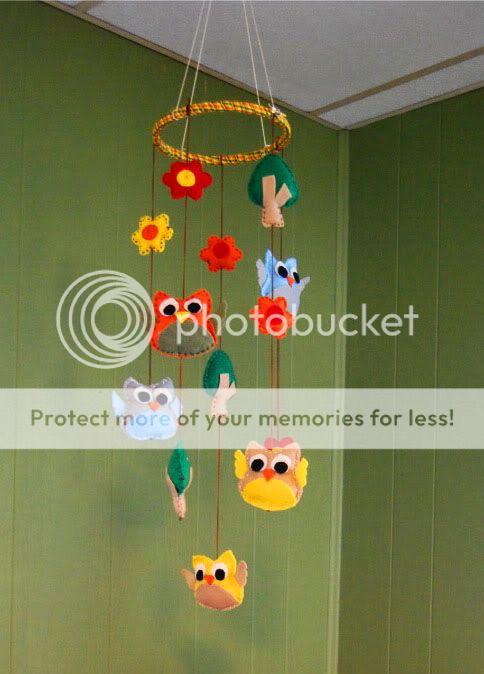
FELT OWL MOBILE
So if you don't already know the twin's nursery is owl themed. Right now owls are all the rage so it is very easy to find cute owl stuff for nursery's...but if you don't want to spend a lot of money and still want something cute you should try this out! This is a very CHEAP and EASY project that I am certain anyone could do.
Supplies needed include: Pencil and paper (for making patterns),Various colored felt, embroidery floss, small amount of poly-fil, Scissors, Hot glue gun/glue sticks, straight pins, wooden or plastic ring, ribbon(optional).
You will have to make your own pattern but owls are pretty simple, a good trick to use is to fold the paper in half and draw only half the owl body using the crease as the middle. This ensures that it will be symmetrical. It is also a good idea to try to find images on the web to give you a better idea of what it should look like. You don't even have to do owls. Really you could do anything bears, lions, cars, rocket ships. Whatever. Once you have your patterns all cut out you can pin them right to the felt and cut out your pieces. Then you just hand stitch along the edges with your embroidery floss, stop before you make it all the way around to put some poly-fil in and then sew the rest up. Use hot glue to glue on any outside pieces like the eyes. You can wrap the wooden ring in pretty ribbon if you want. then just string all the finished pieces with the embroidery floss and tie to the ring, Use some more embroidery floss to hang.
Labels:
baby,
embroidery floss,
Felt,
Kitchen Sewing,
mobile,
Owls
Wednesday, September 22, 2010
Patchwork Craft Sack
I had fun making this because I have never done any patch work before but always wanted to try. I have been trying to organize and sort through my house to make the moving process a little easier. I was going through all my crafts today and deciding what to keep and what to get rid of. While I was doing that I got inspired to make this cute bag to store my knitting in. I have been keeping my knitting projects in a plastic zip lock bag but the needles are always poking holes through the plastic. So I thought it would be nice to have a cloth sack to keep it in. If you don't knit no worries it would be easy to add straps to make it a bag.

Step One: Cut the fabric you are using for the bag to the size you want the bag to be. Leave about 1/2 inch seam allowance. Then take one of your fabric scraps and cut it in a strip long enough to go across the bag with a little excess.
Step Two: Cut strips of your fabric scraps in various lengths and widths. Begin to place them on to the large strip. Arrange the strips until you like how it looks and pin them all into place.
Step Three: Using a zig zag stitch sew all the strips on. I set the horizontal spacing to 0.5 and the vertical to 3.0. This will give you a thick applique finish. This will take quite a bit more thread. It will also take more time.
Step Four: Once you have it all sewn then you can pin the patchwork to the bag and sew it on. I decided to also do a patchwork owl applique with the same stitch. Now you can sew the sack together with the right sides facing. Turn right side out. That is pretty much it. You can add some handle straps to make it into a bag, Or add any other finishing touches you like. This is a very easy bag to make the most difficult part is the patchwork but as long an you have some basic sewing skills I'm sure you could handle it. Enjoy!
You will need:
Your choice of fabric for the bag (I used a jersey knit material)
Various fabric scraps
thread
pins
scissors
sewing machine

Step One: Cut the fabric you are using for the bag to the size you want the bag to be. Leave about 1/2 inch seam allowance. Then take one of your fabric scraps and cut it in a strip long enough to go across the bag with a little excess.
Step Two: Cut strips of your fabric scraps in various lengths and widths. Begin to place them on to the large strip. Arrange the strips until you like how it looks and pin them all into place.
Step Three: Using a zig zag stitch sew all the strips on. I set the horizontal spacing to 0.5 and the vertical to 3.0. This will give you a thick applique finish. This will take quite a bit more thread. It will also take more time.
Step Four: Once you have it all sewn then you can pin the patchwork to the bag and sew it on. I decided to also do a patchwork owl applique with the same stitch. Now you can sew the sack together with the right sides facing. Turn right side out. That is pretty much it. You can add some handle straps to make it into a bag, Or add any other finishing touches you like. This is a very easy bag to make the most difficult part is the patchwork but as long an you have some basic sewing skills I'm sure you could handle it. Enjoy!
Labels:
appliqué,
bags,
Fabric Scraps,
Owls,
Patchwork
Subscribe to:
Posts (Atom)